Tomorrow is Monday, so here's the nail for it~ ^^
 Due to my shaky hands, i have no mood to paint the french 'manually', after base coat, i used tape to stick on the part i dont wanna apply polish, then painted it with white polish..
 *From my experience, do not remove the tape immediately after applying nail polish, better to wait till it dries half way..But this method may differ at different country due to the weather..
 Make sure it's dry to proceed to the next step..
 Using Konad m71, stamp it with dark red polish onto the french tips..But in this nails, i only need the polka dots part, in stead of the whole image..
 Cause it's really hot here, i did this design under high volume fan, so the polish dries up quickly before i stamp it onto the stamper, end up some of the dots missing..
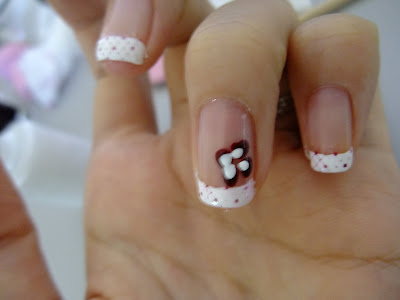 For decoration, i dotted the dark red and white polish on my ring finger as flower and added a rhinestone in the middle..
 Don't forget the apply top coat..
 Product used:*TheFaceShop base coat*Elianto White02*TheFaceShop RD303*Konad top coat*Konad m71*Rhinestone (not in the picture.)
 Done, back to my homework~ ^^
Was hanging around nail blog and found some 'new' blog..Tips & ToesThis is really a new blog, like mine, tehee...NAIL QUEENSuper cool nail art ~!!
S E O U L D I V Amix with her life make up and nails as well...Ok till here, gotta go for class,bye guys~
Wanted to play with lines so come out with this design..In loving with ribbons on nails recently, this included the reason i bought Konad m59, tehee... 'naked' fakkies... hehe..
 Painted black on the half bottom,then add on lines of white, then warm color like red and glitter orange one by one..
 Added yellow and silver too, feel like it needs some bright one..
 Use silver balls to create the shape of a ribbon..
 then the tail..
 Paint the space in the ribbon with beige polish, but after that tot of putting some red glitter also, hehe..After that hand itchi wanna add some glitter, then top coat..Honestly i'm not sure if the ribbon is still nice after adding color, but i do like the soft pink kinda color on it~
 Product used:*Elianto Twillight zone 40*TheFaceShop Twinkle orange*no-brand silver glitter*TheFaceShop BR801*no brand red glitter*Konad top coat*Acrylic Titanium white*Reeves acrylic Lemon Yellow* Reeves acrylic Brilliant red*silver balls
I want many many polishes... nice blue nice green, some shiny bright color and dark one too... ><
Uni's back and here comes the mani-for-buddy back again, tehee..Been starting to help my friends doing mani to train myself doing nails on others few months ago, other than just playing around with my own nails and fake ones... Drying her nail polishes, tehee, thought this photo is cute so put it here..Duckky blow drying nails~ ^^
 French with some dots and fish net deco...
 Using Konad m57..This was the first image plate i bought other than the 'starter kit' with the 3 special nail polishes, 2 image plates stamper and the scraper one, i simply pick one cause honestly i dont quite like the plates that comes along with the kit, tehee..Only after that when i saw plenty of videos and blogs mentioned about it, i knew that m57 is actually quite practical and useful..
 Product used:*Flame 045*Elianto White02*Elianto Twillight zone 40*Konad m57*rhinestonesI first apply 2 coats of the white french tip,then only 2 coats of the baby pink glitter polish on the rest of the nail plate,after the tip has dried, stamp on the fish net pattern only on the white polish area, then black dots on where the french tip and pink polish meets,to friend's suggest, stick a red tear drop rhinestone at cornerlast but not least, top coat to protect the design.. Don't know why my hand shakes a lot when im doing nails, always ruin the design by my own.. sob... ><
This nail was inspired by design from Nature Nails , her original one is very pretty but it makes me think of corset, so i turn out with this.. Accidently deleted the process of creating this nail, opsy... TvTi first apply the beige polish to the whole nail,then the violet,after they are dried, paint the white lines and a ribbon with acrylic,add black glitter at the end of each lines and the gold glitter in top of it,next dip some green blue and the silver glitter polish onto the white lines for decoration, finally when all polish has dried, apply top coat to seal the polish..
 Product used:*no-brand glitter polish*TheFaceShop BR801*Elianto violet red*Flame 045*SkinFood BL503*Revlon double twist base & top coat (forgot to add in while taking picture)*black and gold glitter*Acrylic colors Titanium white
This blog will be all about nails i did, i wear and design. Nail polish will be the main stuff i use but acrylic will sometimes come in, especially on fake nails for practicing... Konad stamping image plates will be used too while doing nails..I usually change my nail polish 3-4 days once, when the polish starts getting off from the tip, cause i do cooking and washing almost everyday so the polish gets out quite fast..Polishes i used are mainly from brands like TheFaceShop, Elianto (Malaysia local brand), and cheap no-brand polishes..I learn all nail stuff by my own, through magazines blogs and YouTube as well, links that i put on the side bar is normally where i got inspiration from, or else pretty much just from my imagination..And something quite important is that, i don't really like pink, so you wouldn't be finding hello kitty cute ones or pinkish design here~So for the first post here, this is what i did today for the first day back to uni~~ Product used (from left to right):*no-brand silver glitter*no-brand silver*TheFaceShop base coat*Elianto Twillight Zone40*Elianto White02*Konad top coat*Konad m53 & m71*small rhinestones
  Apply base coat, let to dry.Then apply 2coats of the silver polish on the tips and let it dry..
 ^^ blow drying my nails with cute little Konad duckduck nail dryer~
 Then, stamp over the image on m71 above the silver tips with black polishthen the butterfly on m53 on top with white polish..

 Added some rhinestones on ring finger's butterfly for fun..Then top coat..
 Here's another version of this nails, white for m71's image then black for the butterfly..
 Hope you like it and thanks for anyone who pass by here... : )

 Due to my shaky hands, i have no mood to paint the french 'manually', after base coat, i used tape to stick on the part i dont wanna apply polish, then painted it with white polish..
 *From my experience, do not remove the tape immediately after applying nail polish, better to wait till it dries half way..
 Make sure it's dry to proceed to the next step..
 Using Konad m71, stamp it with dark red polish onto the french tips..
 Cause it's really hot here, i did this design under high volume fan, so the polish dries up quickly before i stamp it onto the stamper, end up some of the dots missing..
 For decoration, i dotted the dark red and white polish on my ring finger as flower and added a rhinestone in the middle..
 Don't forget the apply top coat..
 Product used:


