Sorry for the delay! ><Life have been busy, i don't have time for nails and some of them are starting to chip now.. :(I don't have class today, so i shall keep come time for here, hehe..  So here's the tutorial for the green set of nails i did awhile ago, i decided to name it the confession of stones, simply because i really can't think of any that i can relate to green color and since it's like full of rhinestones, i thought i could just make them the 'focus' on this nails, though they are, haha...
  Inspiration of my creation~ Nail max^^Credit to the magazine and the manicurist who come out with such brilliant idea~As you can see those nails are will stones covering all up, but i don't have so many types of color and shape of stones, so mine is different from the original one..
 Cheap cheap ingredient for expensive-look nails.. XPBase coat and top coat for real nails of courseglitter green glitter polish (you can pick any color you like but dark one will do better)Stones~~~~~~~ here i'm using the water drop shape one, round one, and moon shape one..and not to forget beadslastly dotting tools or orange stick to help you to pick up the stones..
*****
 Fakies get ready~~~on your mark~~~and go~~~ haha...
 First layer of green polish
 Second layer of green
 I forgot to capture them from the very very beginning of the stones, Rachel's mind already flew to the nails and stone but not camera, untill this, lol..You first put the huge one on where you would like to start off,then surround it with the silver beads,then the red water drop stones, it's like you are drawing flower's petal..Continue with one silver bead on every 2 red one..
 Continue with one purple water drop between 2 beads..
 One silver beads between every purple one again, then you end the pattern with moon shape stones..
 @v@ Kila kila^^
 This is the middle finger..same technic but with different color arrangement and smaller stone on the middle..
 Pinkie... see, i forgot to capture the following steps again, and the index and ring finger, i only realise it after i've done everything, haha...For index and ring, i only use the moon shape stones to make a circle shape by making them vertically, i hope you get what i mean by find that out on my first picture on this post, hehehe...Top coat to protect and seal the design and stones, and you get your nice nice stunning nails^^Some Rachel'graphy for the nails^^vI'm so liking it and i wear it on and flood my camera with photos of them..
 My face looks so yellow-ish.. ><
 Hehe, this is the reflection from mirror, i though it will be something special to use this effect, because i like how the stones become from this effect, hehe...Until next time, see ya~^^Back to my thesis assignment.. ><

 Tehee, Rachel is so sooo proud of myself~ ^^vFound out a blog that provide few links to download japanese magazine and 2 of it are nail magazine, how can Rachel not attracted by it.Both of these set of nails are modified by me from 2 of the designs in Nail Max.Took me quite some time to did it especially the one with loooooots of stones,my neck and eyes are tired now.. T.TBut it worth!!! staring at them make Rachel feel so good, who say we must go to nail saloon to get these bling bling done?! And using so much of stones here didn't even cost me much, lolx..Come come i go do business on nails Danielle Kae you all can come over everyday with discounts.. XPOk finish getting excited, will upload more on the details and how i did it later tomorrow, just can't wait to show you all 1st, hehe...Time to let my hand my eyes my backbone rest, night to Rachel and morning to those at the other side of me~ ^^/
 Well well, i was watching Tanja's latest you tube clip on iced heart mani and i accidentally saw the mani she was wearing on her nail are cute! (she's demonstrating the iced heart on fake one)It's white base with pink circles on the tips, but i don't feel like doing it pink, so i decided to come out with my own one~
 Simple little ingredients to kirei kirei (beautiful in Japanese) nails~ ^^White nail polishBlack glitter polishDotting tool
 Black glitter your nails..It's been some time ago since i paint my nails black~ ^^
 As the picture says, this is the failed one i've made.. -.-''i used light blue, turquoise and peach color to make circle outlines but the various of colors seems to make the whole thing looks messy, i only did this on left hand to try it out so i just remove everything on left hand and re-paint the black one to start again~Even genius make mistakes right.. :)
  Here's the success one~ ^^ tehee...I only use white to make the circle this time, Tanja's one was the outline of circle, but i decided to make mine with dots, looks cute~(indoor light)
 Now i know why nail bloggers like sunlight!It's just make the mani so sooooo stunning and looks better with natural light..Cause normally i only do my nails at night, so i have no more sun light,But now Rachel is kinda changing little bit of here and there, i also take photos of my nails the next day after i'm back from class when sun is still high up there, nice^^
 And it makes my skin looks healthy, lolx..
Faster grab the hot fresh out-of-oven mani~~~!!! lolx...This was what i did an housr ago today, after i woke up and had breakfast..Hehe, cuz normally i will do nails at night when i've done everything,but since i get up early today and class is at noon, i got time~! ^^v To create this GORGEOUS nails ( i want it to be gorgeous, so it must be it!!! wahahaha.. )My dear friend you would have to first...
 Pamper your hands~ ^^The Body Shop Peppermint Smoothing Pumice Foot ScrubEuBos free gift Nail bufferThe Face Shop Nail SupplementThe Face Shop Base CoatWatson Cuticle pusher x2Dont get me wrong of the foot scrub, because it's time to remove my toe polishes,so i did my pedicure before mani one. Actually i did my feet care hand care last night and let them sleep with clean clean condition, and only paint them this morning..I only use the foot scrub for feet, not hand, haha.. My routine~for feet:Soak in warm water for at least 5 min,scrub scrub scrub^^wash,cuticle push push push, (i will only cut off the cuticle once in awhile)trim the nails,nail supplement, and let them rest.. :)For hand:soak in warm water for 5min as well,push cuticle, cut it,trim nail shape,nail supplement,base coat and starts painting~ ^^So here's the polishes i used for this mani~
 QY no-brand polish WhiteSkin Food BR609no-brand thin tip brush glitter greenRhinestonessss~Elianto Top Coat
 Let's start~ ^^v
 White polish as base..
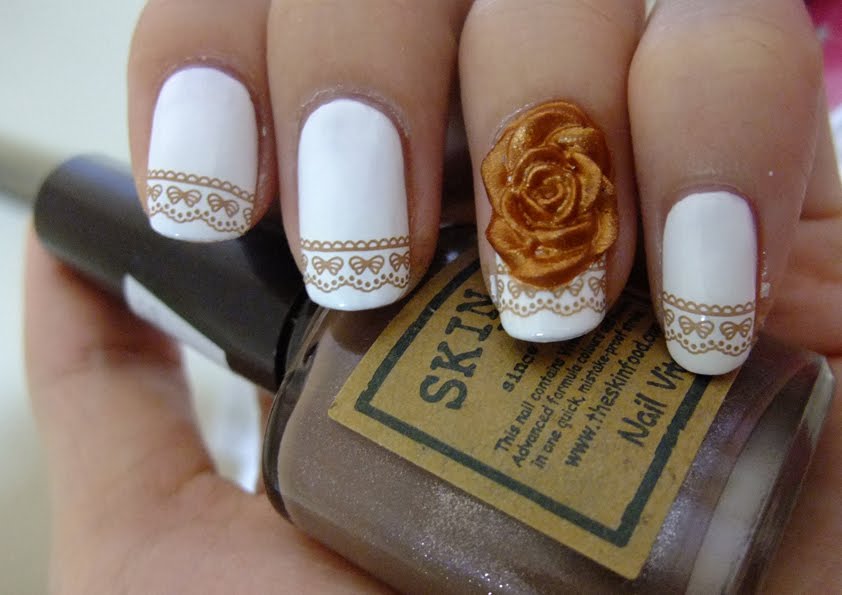
 Then Konad with the glitter brown one...
 light green glitter to make net pattern near cuticle,and add roses to your preference..
 Bling with rihnestones~~ @v@
 Top coat and you're ready to go out bling other's eyes~~~ ^^ wahahahha...
 Some close up~ This is my left index finger..
 left ring finger...
 left pinky...
 Cuz i'm right handed thus my left hand is quite shaky to do the same pattern as what she had,only 2 roses for right to reduce miserable mistake, lolx...
 My hand looks long, but you can see the bones all looks big...Thanks to my sweetie, he always 'crack' them, he loves to, haha... T.T^^ okie bye guys~ time to go to class~~~
 22+ hours more to go and i will be turning to 21 years old.T.T i feel like getting older and older..Because to me, 16 means you are legal to drink ('legal' here means permission from parents, not the government, lol)18 means you are no more a child 20 means you are fully responsible to your future, and your face needs anti-aging product from now on25 means you are old enough to... get married??! (25, Rachel don't like this number because it's when your wrinkle "bomb bomb bomb!" start coming out like no tomorrow and you need to feed your delicate skin with millions bottle of 'food' to keep it 'doink doink Q Q' young and smooth, ko wai i ko wai i!!!!!(scary)!!!)30 means, you may not look beautiful anymore to fit in your wedding gown!!! wuwuwu...I want myself to look deadly gorgeous pretty stunning damm beautiful enough to make everyone envy to be in the wedding pictures!!!! ><''21....21......21........Rachel's parent's eldest daughter is 21 soooooon~And what key will i get daddy? hmm~~~ heaheahea.... >:p
This is a similar mani of Golden sand i've created sometime ago, but this time i use different base color and patterns.. ^^ Firstly, ingredients for blingbling nails~ ^^Olive green polish,gold glitter polish,silver glitter polish,dotting tools, rhinestones~ @v@
 Base coat EVERY TIME before you go any further..Olive green as gradient base~i paint my nails a wide french, then slightly go through the french line with the 'leftover' polish on the brush to create the gradient..
 2 coats of gold glitter,just simply paint over the olive...I added one more layer of silver glitter on 3/4 of the nails after that,just want it to be bling-er~ hehe...
 Whether to wait for it to dry, you can add on rhinestone at any time..I prefer to add it when the polish are still tacky, this way it can 'enhanced' the stickiness and hold the rhinestone better..Top coat and you're done to hurt people's eyes now~ heaheahea...>:)
 Oh ya, the name of this mani is actually direct translate from a mandarin proverb -- gold silver jewel, simply means jewelry, in a nicer way.Since i got so many blings on my nails, i think they suit the name, haha... ^^v
 The roses i'm holding was made of tracing paper,i had a presentation in class today, and i need to prepare a visual aid on my artwork, so needed the tracing paper to cover it as protection..i use the leftover to fold into roses after my turn of presentation, i was the second to present so i have plenty of time left in class listening to classmate's presenting..i made 3, and gave 2 to Amelia (her nails appear in my blog before, lolx..),mine was now on my ducky ducky's 'head' as her head accessory, haha, will take photo of her again to show you all~ ^^Well then, night night everyone and morning morning~ :)

 So here's the tutorial for the green set of nails i did awhile ago, i decided to name it the confession of stones, simply because i really can't think of any that i can relate to green color and since it's like full of rhinestones, i thought i could just make them the 'focus' on this nails, though they are, haha...
  Inspiration of my creation~ Nail max^^
 Cheap cheap ingredient for expensive-look nails.. XP
 Fakies get ready~~~
 First layer of green polish
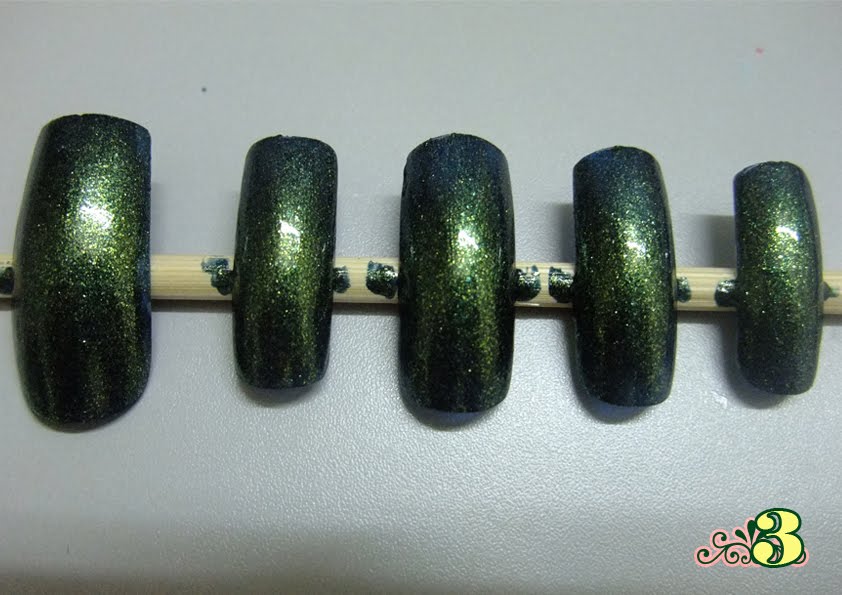 Second layer of green
 I forgot to capture them from the very very beginning of the stones, Rachel's mind already flew to the nails and stone but not camera, untill this, lol..
 Continue with one purple water drop between 2 beads..
 One silver beads between every purple one again,
  @v@ Kila kila^^
 This is the middle finger..
 Pinkie... see, i forgot to capture the following steps again, and the index and ring finger, i only realise it after i've done everything, haha...
 My face looks so yellow-ish.. ><
 Hehe, this is the reflection from mirror, i though it will be something special to use this effect, because i like how the stones become from this effect, hehe...